
Prompt RTM Billing Integration Setup Guide
Below is a quick step-by-step guide for correctly setting up the RTM Billing integration between Prompt and Prompt Engage.
Quick Summary
- Company Settings: Enable RTM company-wide.
- Payer Rules: Turn on RTM billing defaults (or apply to specific payers).
- Case Level: RTM status must be Active.
-
Prompt Engage: Verify RTM is enabled for the patient.
Step 1: Company Settings (Prompt)
- Go to Company → Settings.
- Click EDI Settings to expand the menu.
-
Look for RTM Payer Rules — it should be suggested
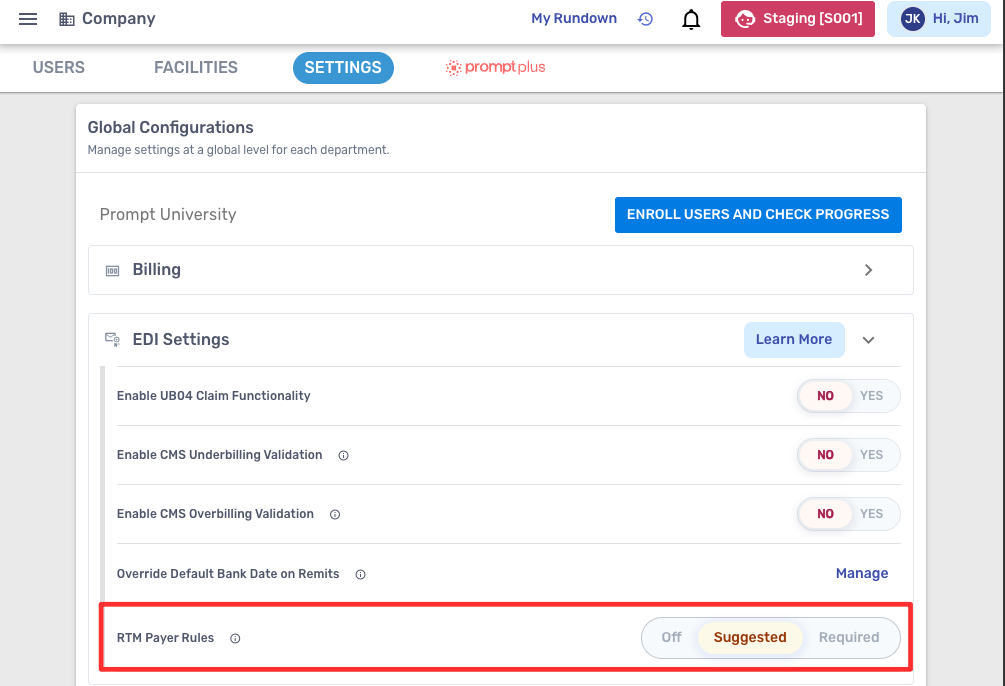

This rule defaults to Suggested, which populates a yellow checkout alert when appropriate to suggest a provider utilizes the correct RTM code. Setting this to Required populates a red checkout alert and providers will not be able to complete checkout unless the correct code is used or the wrong code is removed.
- Next, go to Clinical Settings (still under Company Settings).
- Scroll down and find the option:
-
“Enable this if your company performs any RTM services.”

-

Step 2: Payer Rules Setup (Prompt)
-
Go to Address Book → Payers.

- Review your Insurance Type Rules.
- Scroll down to find Remote Therapeutic Monitoring Status.
- Make sure the following options are enabled (ON):
- RTM Status: Default ON
- Bill RTM Codes as Part of Actual Visit: ON
-
When Secondary Payer: ON
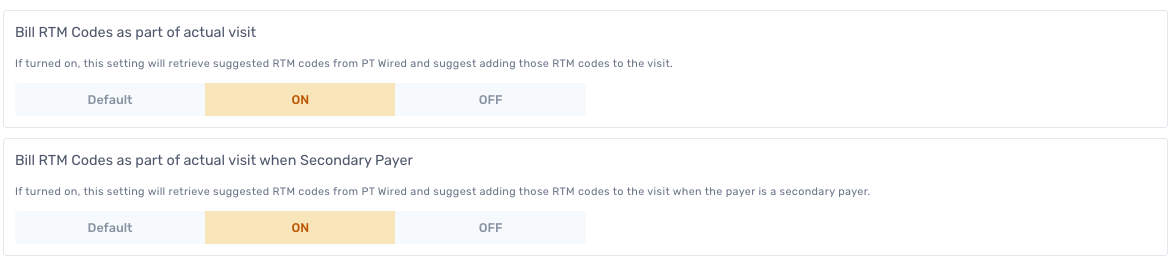
- If you want these settings to apply to all payers by default, enable them at this default level.
- If you only want to enable RTM for specific payers (insurances):
- Select each payer individually.
- Apply the same RTM settings manually for that payer.
-
Example: Turn ON for Medicare only.


Step 3: Add RTM Code to your Charge Master (Prompt)
- Go to Company → Select the Facilities tab
- Choose your Facility
- Select Fee Schedule and click the ‘Pencil’ icon to Edit
- Unlock the Fee Schedule
- Add the RTM Code in the field: “Add Another CPT Code”
- Enter the Charge Amount and click the “Clock” icon to choose if it will be Timed or Untimed
- Click “Save Fee Schedule”
For a more detailed instructions, visit this page: Edit an Existing Facility's Charge Master.
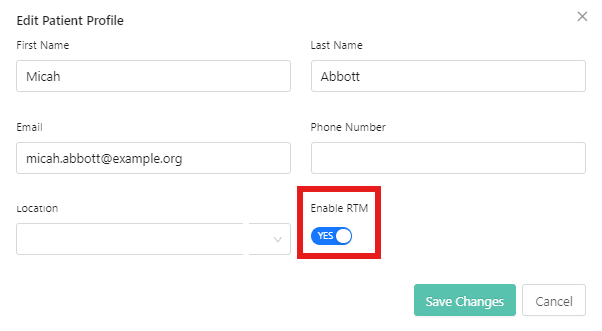
Step 4: Patient Case Level Setup (Prompt)
- Go to the Patient’s Case.
- Confirm that the RTM Status is set to Active.
-
(This ensures the patient is included in RTM billing processes.)

-

Step 5: Prompt Engage Setup
- Open Engage or any of the patient’s Engage HEPs in Prompt.
- Verify that RTM is enabled for that patient in Engage.
-
This ensures billing codes sync correctly between systems.
-

Note:
- For a more detailed guide on Prompt & Prompt Engage RTM integration, please visit this article in Prompt: Prompt Engage - Streamlined RTM Billing in your Prompt Documentation